Practically every film or video you watch these days is made up from thousands of 8x8 blocks of pixels described by a tiny stream of bits taking up just a fraction of the size of the original uncompressed data.
When the bitrate is high and the compression was done well (for example in a BluRay film), it can be almost impossible to tell this while the image is changing and you aren't sitting close to the screen.
But pause the film, sit up close, and look in the dark places, and you will probably start to see those tell-tale square compression artifacts. When the bitrate is low, or the compression was done in real time, say by a camera or smartphone, then those squares will be everywhere plain to see. If a video was captured compressed, then decompressed, edited, and recompressed, things will likely be even worse. But, by now, thanks to YouTube, we are all totally accustomed to them.
| 6Mbit/s |
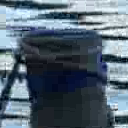
|
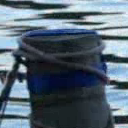
| 12Mbit/s |

|
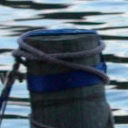
| 25Mbit/s |
|
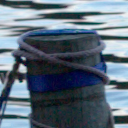
| 50Mbit/s |
|
| RAW |
|
Films are not made that way. High end (and of course very expensive) digital film cameras can record uncompressed images which are used all the way through the editing process, with compression only being applied right at the end for distribution. Now thanks to RAW video enabled by Magic Lantern for Canon DSLRs, life without artifacts is now available to non-professionsals with more modest budgets too.
So, I've taken the plunge and moved to RAW. I have hundreds of gigabytes (seriously) of artifact-free footage recorded in the latest Magic Lantern MLV (RAW v2) file format. Now what. How do I watch it?
The tools seem to be lagging a bit behind here. The start of most "workflow" right now is to use the mlv2dng tool to create individual files for each raw frame in the video in Adobe's widely understood DNG format.
If you have a Mac or Windows, those thousands of DNGS can then be imported either into a tool like Adobe After Effects, or DaVinci Resolve (which currently needs an NVIDIA GPU). Those allow fine control of colour mapping (usually called "grading") and other effects using the full colur resolution, before you finally convert the result into a compressed video.
If you're using Linux, like me, different options are needed. A not-so-quick but dirty way to preview the video is to use a couple of commands like:
dcraw -T *.dng
ffmpeg -i %6d.tiff -vcodec mjpeg -r 25 -q:v 1 video.avi
This can still take a little while to churn through the images, and then ffmpeg doesn't always seem to do a great job mapping the colour ranges. But it works. Only don't forget to delete all the intermediate files afterwards otherwise you will have quintupled your file space.
This approach quickly got tedious for me after working with more than a few videos. What I really wanted was something that could just play all the raw videos directly like any other video format, so I could decide which ones deserved further editing.
In theory it should be easy. The Bayer filter frames are not compressed, so all you need to do to display the video is parse the file format to get them off the disk into memory, and interpolate the two missing colours for each pixel. It sounds like a perfect job for a shader, so I had a go at writing a GPU-based RAW viewer.
My usual weapon of choice for quick experiments like this is python. The trouble with python is that it has quite poor performance if you implement things in a naive or brute force way. But if you are just using it to glue together and coordinate high-performing libraries, then it is fine.
For operations on large numerical arrays, the numpy library is normally a good bet. However in this case the main CPU operation needed when reading the raw images was to convert from a stream of packed 14bit values into 16bit values that can be loaded to the GPU. Numpy was able to do that much faster than pure-python, but a dedicated C extension function was faster still.
Once the raw bayer frames are loaded into textures, a shader is needed to convert to an RGB image. I tried implementing a few different basic so-called "demosaicing" algorithms to do the interpolation of the missing colours. The best ones attempt to avoid visible colour fringes (hue changes) in areas where the intensity changes quickly. But to start with I went with a simple bilinear filter, though operating on log values to reduce fringing.
A second shader takes the (16bit) output of the demosaicing, and converts it for display on screen. Currently this involves a hard-coded white-balance adjustment, and a tone mapping function to make darker areas more visible.
I made parsers for both of Magic Lanterns raw formats (.RAW and .MLV) since I have files in both formats. That also required supporting larger videos split across multiple files.
The result to start with is a simple program you launch from the command line with the video filename, that brings up a window playing the video in a loop. You can make the video fullscreen with TAB, and end playback with ESCAPE. Highly sophisticated, I know. The frame rate is currently fixed to roughly 25FPS, or less if your disk is not fast enough.
I've tried it on Linux and Mac (update: AND Windows7), and in theory it could work on Windows too. It depends on pyOpenGL and numpy modules, and goes faster if you compile the included bitunpack module. In case you are embarking on the same raw video adventure as me, maybe you will find it useful.
Link: MlRawViewer Bitbucket repo